Content from Introduction
Last updated on 2025-11-11 | Edit this page
Estimated time: 40 minutes
Overview
Questions
- “What is static web content?”
- “Why should I use GitHub or GitLab Pages to create my website?”
Objectives
- “Explain what a static site generator does.”
- “Choose the appropriate tool for a website/project.”
How Websites Work
When we use a web browser to visit a page on the World-Wide Web, the browser asks for information from a server - a computer storing the data relevant to the site and configured to receive and respond to requests for that data. Assuming there were no problems at this stage (e.g. asking for a page which doesn’t exist, or being unable to reach the server), our browser receives and interprets this information to render and display the webpage on our screen. (A web developer would probably be horrified to read such a gross oversimplification, which is just one reason why web developers are not the target audience of this tutorial.)
The page displayed by the web browser is the result of combining HTML - a hierarchical format describing the structural elements of the page and their raw content - with CSS - an ordered set of styling instructions telling the browser how the content should be organised and formatted - and any images that should be embedded in the page. Other information received from the server, but not displayed by the browser, includes metadata, cookies, and other non-visible elements in the HTML - information about the site that could be relevant for a computer but probably isn’t interesting to a human (there are exceptions to this) - and scripts that the browser may run to do something in response to various triggers.
Hello World in HTML
When learning a new programming language, you may often find a
reference to the popular Hello world example. These
examples typically capture the simplest code that can produce and
display the text “Hello, World!” on screen.
As HTML requires certain tags to be present and almost always in
matching pairs (open <tag> and closing
</tag>), HTML documents tend to get verbose rather
quickly.
The simplest, valid HTML Hello world is:
HTML
<!DOCTYPE html>
<html>
  <head>
    <title>Page title</title>
  </head>
  <body>
    <p>Hello, World!</p>
  </body>
</html>
So as you can imagine, writing long HTML documents by hand is rather painful. Notice that we didn’t specify anything about how and where the text should be displayed.
To achieve this we would additionally need to include stylized tags or Cascading Style Sheets (CSS) instructions. If you do not provide CSS instructions (either inside your HTML document or as a separate file), a web browser will make a best guess regarding the layout of HTML elements on the page based on its defaults.
Exercise: Writing Basic HTML
Given the stylized text:
Hello, World!
write the HTML that will produce the same result. Hint the big font is achieved by use of a heading.
Let’s write a more complex HTML example using a table showing the
“Hello, World!” text in different languages that renders like: 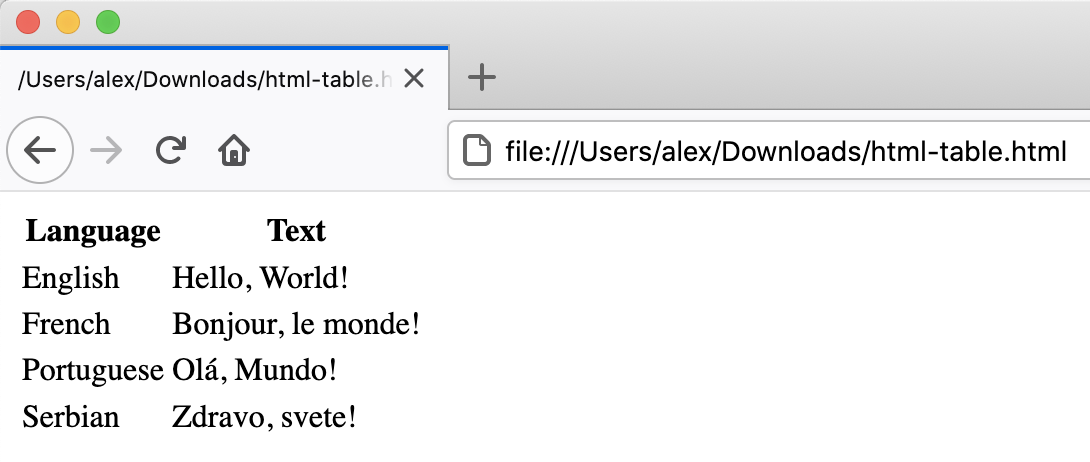 {:
.image-with-shadow width=“600px” }
{:
.image-with-shadow width=“600px” }
The HTML to produce such a table looks like this (you can copy+paste the snippet into the HTML file you created in the previous example):
HTML
<table>
    <tr><th>Language</th><th>Text</th></tr>
    <tr><td>English</td><td>Hello, World!</td></tr>
    <tr><td>French</td><td>Bonjour, le monde!</td></tr>
    <tr><td>Portuguese</td><td>Olá, Mundo!</td></tr>
    <tr><td>Serbian</td><td>Zdravo, svete!</td></tr>
</table>
Each row is enclosed between table
row <tr> and
</tr> tags. Within a row, <th> and
</th> tags are used to contain table
headings (special table cells displayed in bold font),
while regular table data cells are
contained within <td> and </td>
tags.
A similar example written using HTML lists would look as follows:
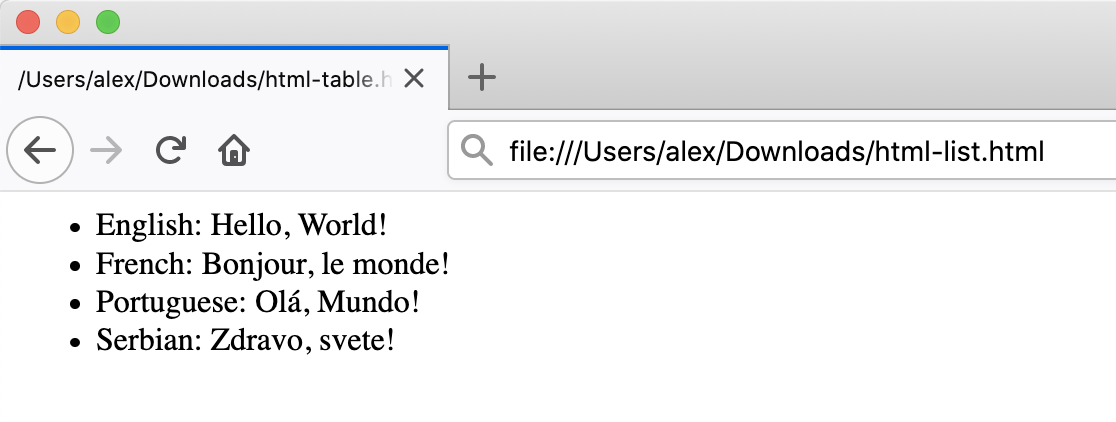 {:
.image-with-shadow width=“600px” }
{:
.image-with-shadow width=“600px” }
HTML
<ul>
    <li>English: Hello, World!</li>
    <li>French: Bonjour, le monde!</li>
    <li>Portuguese: Olá, Mundo!</li>
    <li>Serbian: Zdravo, svete!</li>
</ul>
Here, we used unordered list tags
<ul> and </ul> to define a list
with 4 items, each in turn wrapped in individual list
item (<li> and
</li>) tags.
Static vs Dynamic Sites
Static pages are those whose contents are stored on a server in a state ready to be sent to any user who makes a request for that web page. When a request is made, the server only needs to send the information comprising that web page (such as HTML and CSS). Sites that do not change often, such as a website containing one’s CV, are often stored as static sites.
Conversely, dynamic sites are those that have their pages generated when a user makes a request for a web page. Depending on when the request is made, the content might change; for example, clicking refresh when viewing a discussion in a web forum might result in new comments showing up. The key difference is that static pages need only be generated once, after which they rest unchanged on the server, compared to dynamic pages which are regenerated by a server every time it receives a request. This lesson focuses on static sites and tools that can be used to create them, known as Static Site Generators.
One of the advantages of using static site generators is that they remove the need for us to manually produce a lot of HTML, allowing us to focus on the human-readable content we want our pages to contain. However, we still need a way to tell the generator how we want our content to look when it’s displayed in the browser. For that, we will use a tool called Markdown, which we’ll learn about in the next episode.

Figure 1.1: Page Generation Alternatives. This figure is a modified version of the original published in [JavaScript for Data Science][js4ds], and is reproduced here with permission from the author.
Static-generated sites are a great choice when the information you want to display on a website is the same regardless of who visits your site and when, and if the content of your pages is unlikely to need to change very often. This makes Static Site Generators a good choice for sites that provide documentation or lesson content like this page: the aim of the page is to deliver the same information to every visitor. The visitor can arrive, (hopefully) find and read what they need, and leave feeling happy and fulfilled.
Dynamic sites provide a lot more possibilities for providing interactivity and personalised or topical content. But creating them is a degree more complicated and also places considerable additional burden on the server, not least in terms of computational requirements and security considerations. Among other things this means that, unlike with static pages (see the rest of this lesson), you’re unlikely to find cost-free platforms to help you deliver dynamic content.
Challenge: The Perfect Tool for the Job
Given the following types of websites, reason if a static site generator is an appropriate solution to implement them.
- A personal website with About and Projects sections
- A forum or discussion platform
- A community blog or news website
- A search engine (such as google.com)
- A wiki (such as wikipedia.com)
- An online book
- personal website: In most cases, Yes. This kind of content is typically written/edited by one person and meant to have a read-only access to visitors.
- forum or discussion: Most likely No. Such website requires interactivity and ways to identify who wrote what content.
For questions 3 and 5 the answer is both Yes and No depending on the requirements and necessary functionality.
- blog/news: A simple blog or news website, maintained by a small set of users, is perfectly achievable by using a static generator. For very large groups of content creators or if access to articles needs to be controlled individually, using a static generator will lead to difficult technical challenges.
- search engine: Most often No. Implementing something as sophisticated as Google’s search would be close to impossible with a static generator. There are ways to have a simple engine that searches across all pages produced by a static generator using indexing and making clever use of browser features but this approach has many limitations.
- wiki: A simple wiki is perfectly doable with a static generator (e.g. GitHub Wiki Pages), however it becomes limiting as soon as its content needs to be edited or discussed by many users, as is the case of Wikipedia.
- online book: Definitely Yes. Static generators are perfect for this type of website. They typically provide ways to avoid repeating content (variables and templates), automatic creation of a Table Of Contents, among other goodies.
GitHub Pages
If the site you want to create is a good match to the strengths of a static site generator - it’s relatively small, will be updated relatively infrequently, and the content does not need to be personalised to the visitor - then creating it with GitHub Pages is a good option. GitHub Pages is a system allowing users to create and serve websites directly from their GitHub repositories. The service is free for public repositories and simple pages can be created and served with very little configuration required.
There are many different technologies that come together when creating a website with GitHub Pages that you have to be familiar with (as shown in the diagram below). It may sound overwhelming at first but we will explain most of these technologies in this lesson - we only don’t cover CSS/Sass (styling language that gets compiled into CSS) and JavaScript/CoffeeScript (scripting language that gets compiled into JavaScript) in detail.

First, we are going to set up a repository to store our files and learn more about how to author and format the content of our pages using HTML and Markdown, before configuring GitHub to display this content as a website using GitHub Pages.
Setting Up a Repository
Before we get into working with Markdown we must first create a
repository to work in. This repo (short for repository) is similar to a
folder on your computer, the main differences being that the folder
lives on the web in GitHub/GitLab (though you can also keep a copy on
your computer if needed) and that folder is using a version control
software called [git][git] to track changes to the files.
For our purposes we will mostly be ignoring the version control
software, though it can be handy if you need to revert to old versions
(see [Software Carpentry - Version Control with Git][swc-git] for an
introduction). In this lesson we will be working with this folder on the
web to control the website we will be creating.
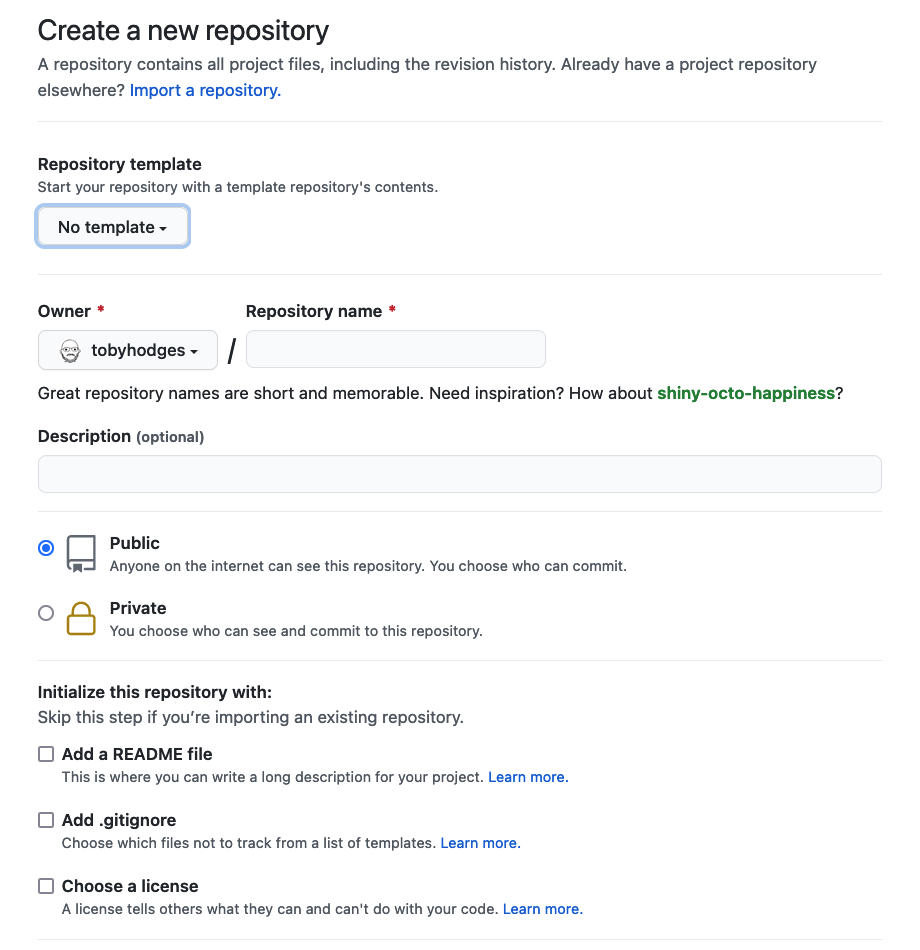
Setup a GitHub account
Before you can create a repo, you will need to create a GitHub account
Make sure to login with your GitHub account and visit https://github.com. Click the green “New” repo button on the left hand side of GitHub:

or click the “+” menu in the upper righthand corner and choose “New Repository”.
 {:
.image-with-shadow width=“200px” }
{:
.image-with-shadow width=“200px” }
Next you will need to fill in some info about your repository.
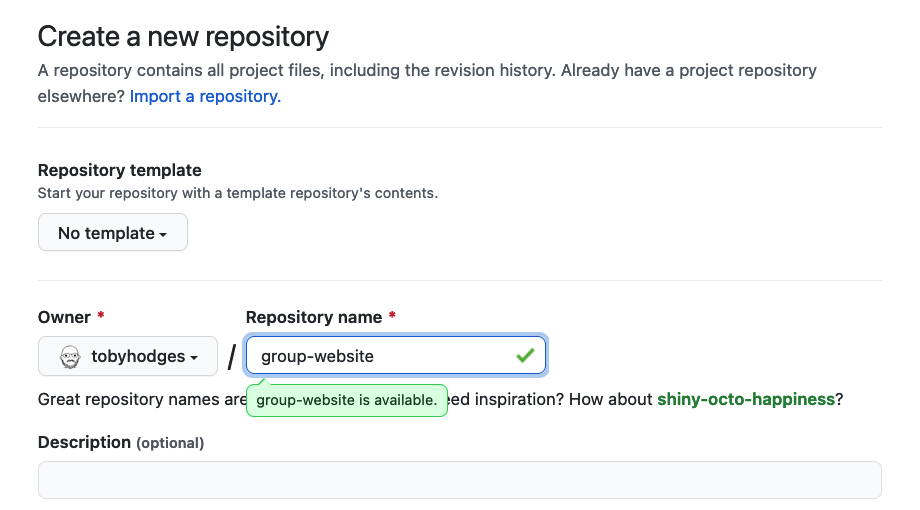
In this lesson, we will be working on a general group website. You
can imagine this website may be for your lab group, a specific project
group, or another group you work with. Under the “Repository name” field
type group-website.
We can also add a description (for instance Repo for learning how to make websites with GitHub pages) so we know what this repo is when we find it again after the workshop.

Under the “Initialize this repository with:” section we will check
Add a README file and Choose a license. It is
good practice to have a README file that gives more information about
your repo and to set a license for your work.
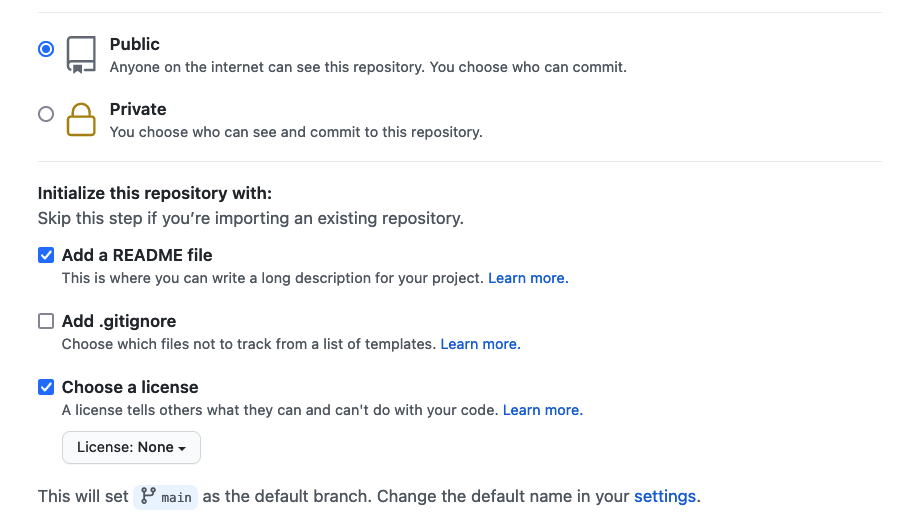
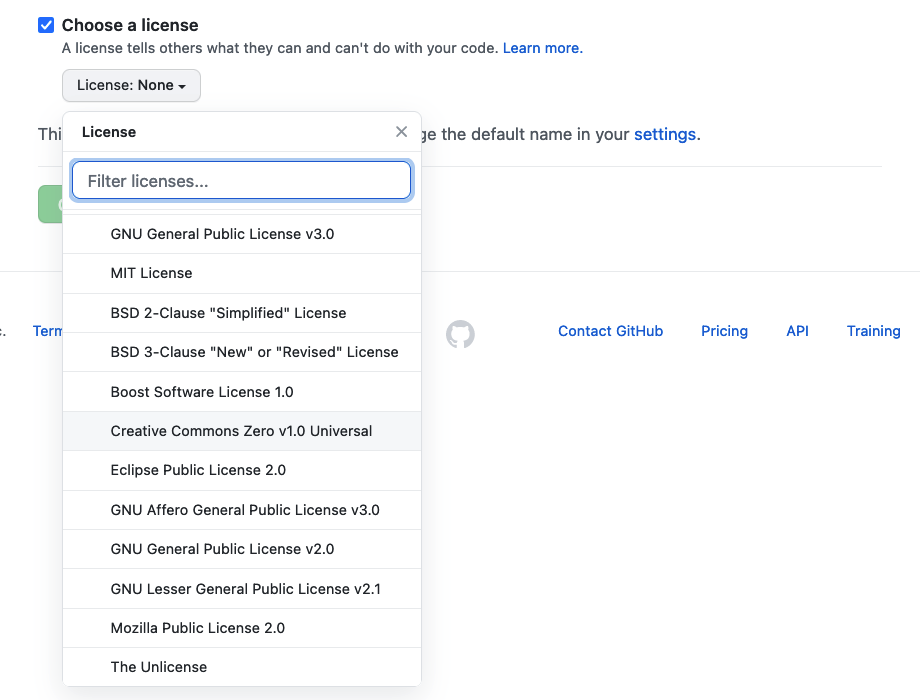
for this example repository we’ll use the
Creative Commons Zero v1.0 Universal (CC0) license, which
allows anyone to re-use and adapt the content of the repository without
restriction, but you may want to consider choosing something more
restrictive when you’re building your own website.
Checkout Other Licences
You may want to checkout this lesson or GitHub’s license documentation for more information about possible licenses.
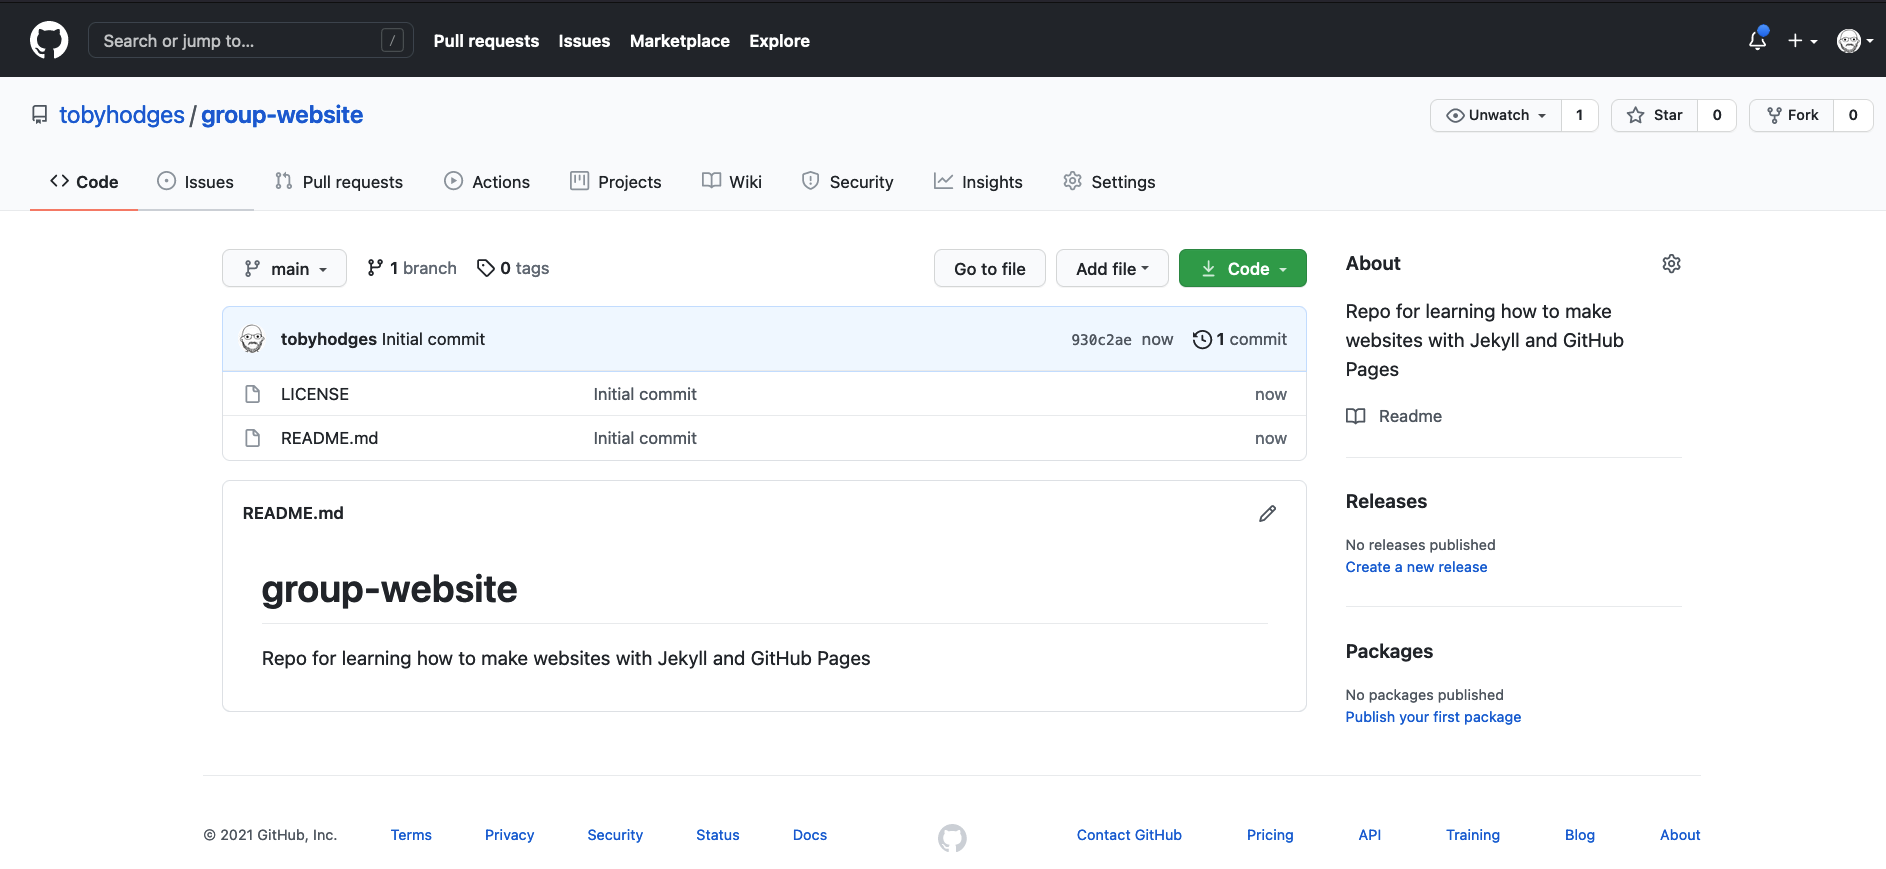
Once you’ve finished these steps you can click the “Create Repository” button to finish creating the repo.
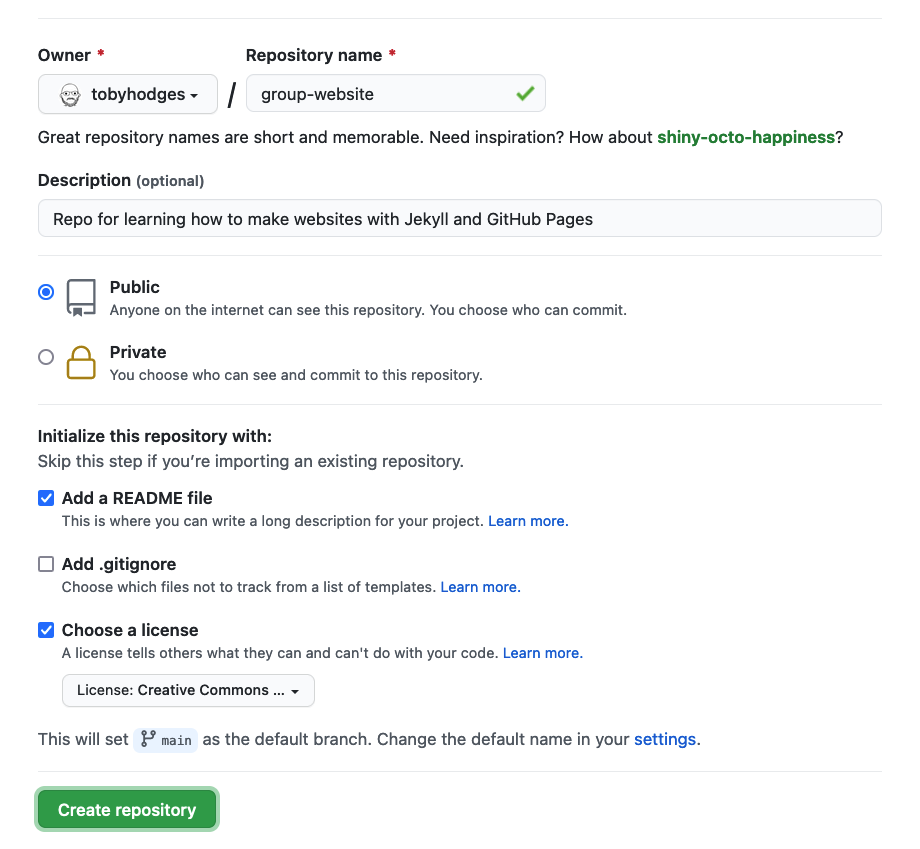
GitHub will then setup the repo and it should create the repo called
group-website with a README.md file and a
LICENSE file.
- “A static site generator combines page-specific content with layout elements and styling information to construct individual static webpages.”
- “This approach can be used to create a relatively small website/blog on a limited budget.”
Content from Hosting Websites on GitHub
Last updated on 2025-11-11 | Edit this page
Estimated time: 40 minutes
Overview
Questions
- “How do I publish my page or a website on the Web via GitHub?”
Objectives
- “Publish on the Web with GitHub Pages”
GitHub has a service for making content available online called GitHub Pages.
Publishing a Website With GitHub Pages
GitHub Pages is a free website hosting service by GitHub that takes files (Markdown, HTML, CSS, JavaScript, etc.) from your GitHub repository which is configured as a website, optionally runs the files through a build process, combines them and publishes them as a website. Any changes you do to the files in your website’s GitHub repository will be rendered live in the website.
There are other services available to create and publish websites but one of the main advantages of GitHub Pages is that you can version control your website and therefore keep track of all your changes. This is particularly helpful for collaborating on a project website. GitLab, Codeberg, Sourcehut and BitBucket offer similar services.
Let’s continue from the GitHub repository we have created in the
previous episode. One important file you should already have is
README.md, which will become the homepage of your project
website.
Enabling GitHub Pages
In order to tell GitHub that your repository contains a website that needs rendering you need to configure GitHub Pages settings. You can do so from your repository’s Settings page, as explained below.
You may have noticed that when we created our repository in previous
episode, by default GitHub created a branch called main and
stored our files there. We now need to tell GitHub Pages that this
branch contains our website files.
What Is a Branch?
You may have never heard about Git branches and wonder what they are.
A branch is one version of your project (the files in your repository)
that can contain its own set of commits - you can have many branches
(versions) of your repository. The default branch automatically created
with a new github repository is called main.
-
Click on the repository’s
Settingstab (the one with the little cog/gear icon) as shown on the figure below: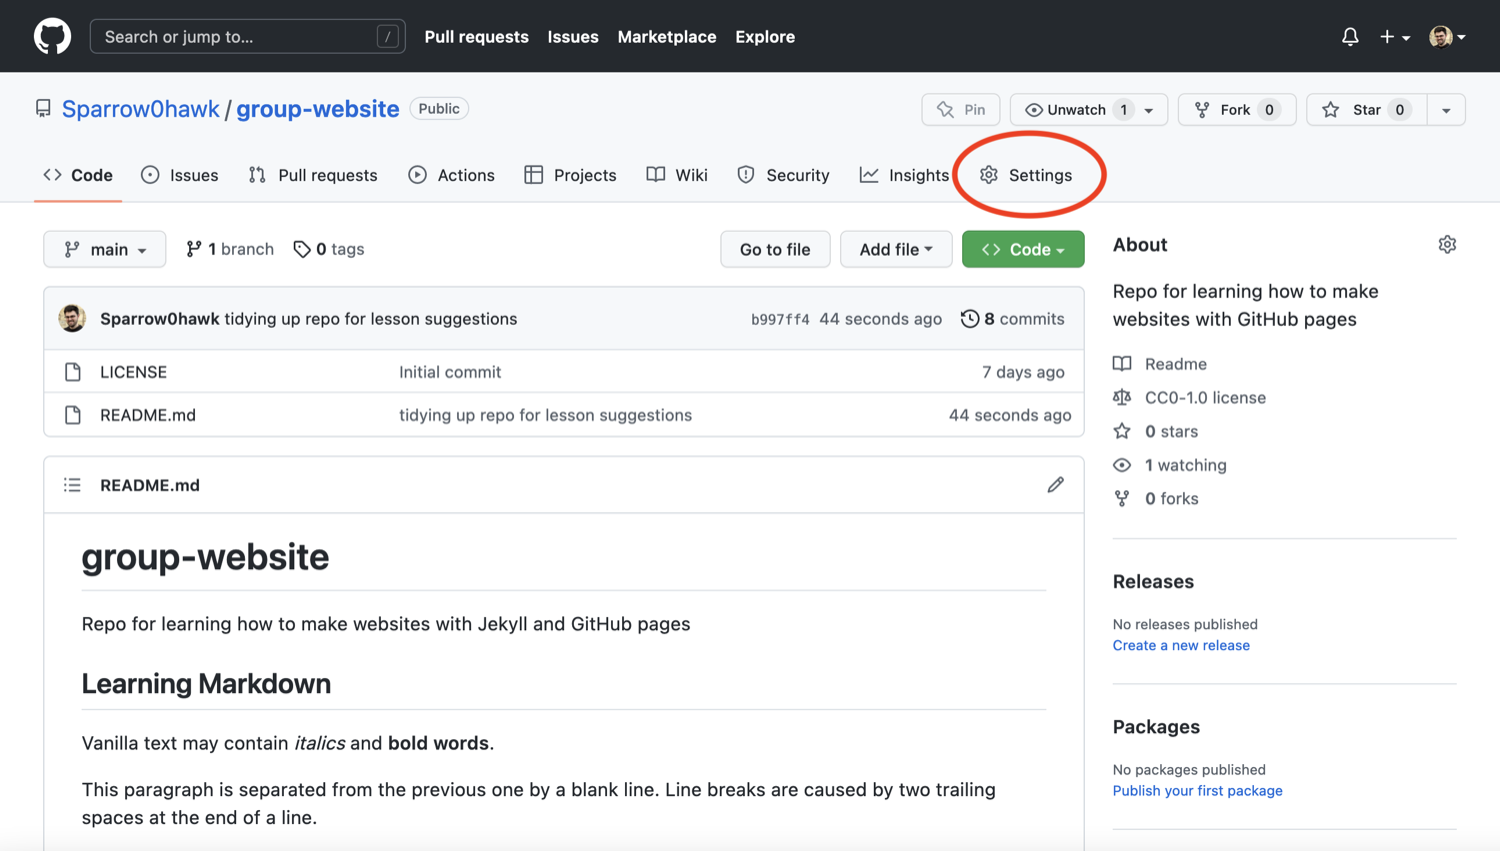 Repository ‘Settings’ button in GitHub interface
 -
On the menu on the left hand side, click on
Pages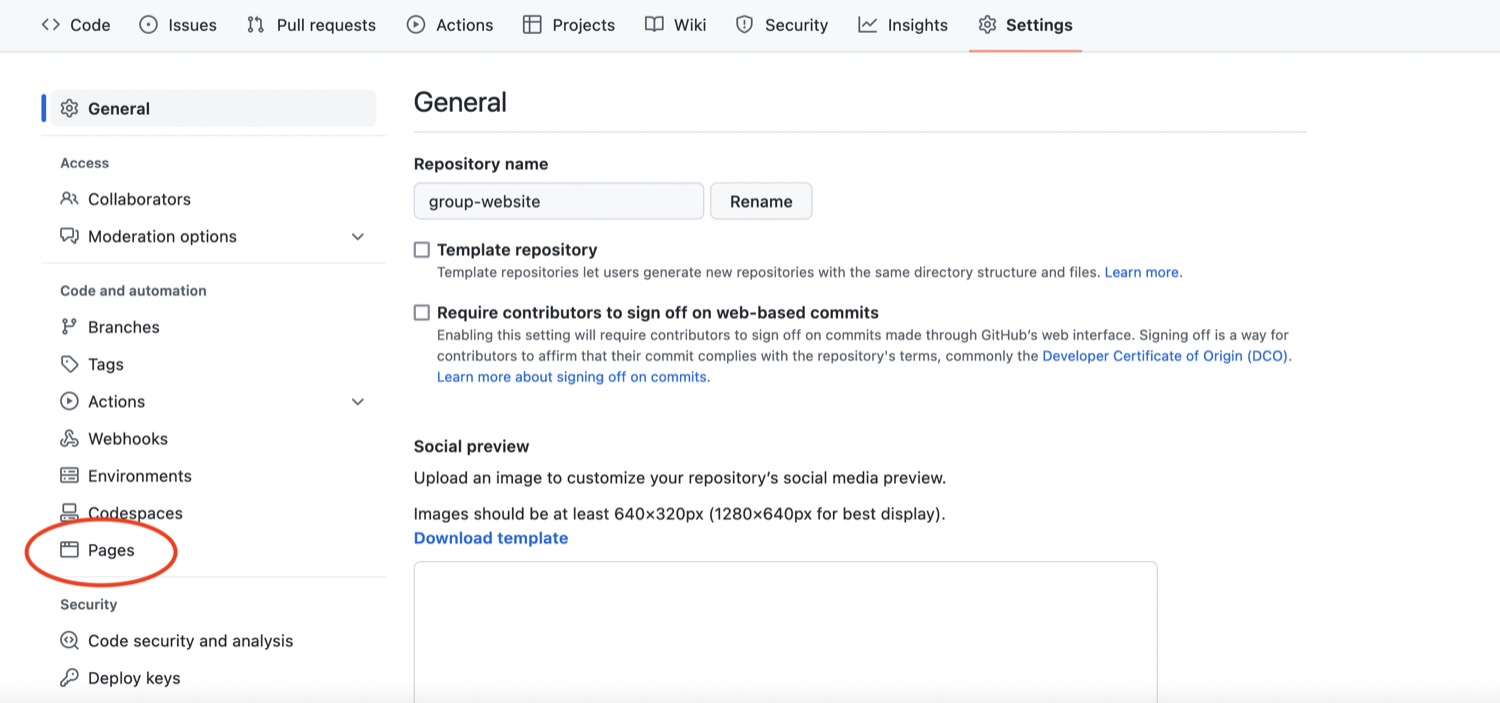 Select ‘Pages’ tab in repository settings
 -
You will see that the GitHub Pages settings are currently disabled. Select branch
mainto tell GitHub which branch to use as a source and clickSaveto enable GitHub Pages for this repository.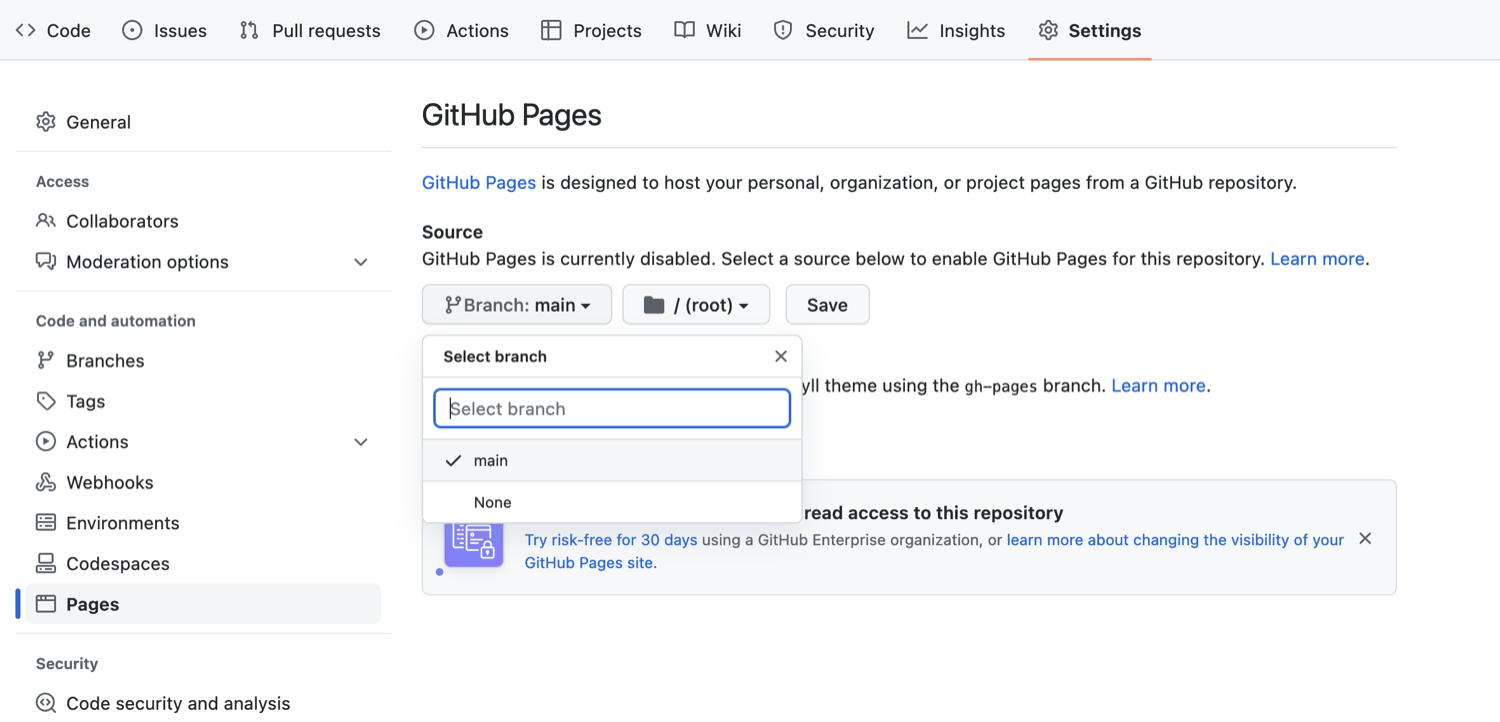 Set default branch for the website in repository settings
 -
The link to your repository’s website will appear in the highlighted box above. If you click the link - your default browser will open and show your project website. If this does not happen, you should manually open your favourite web browser and paste the URL.
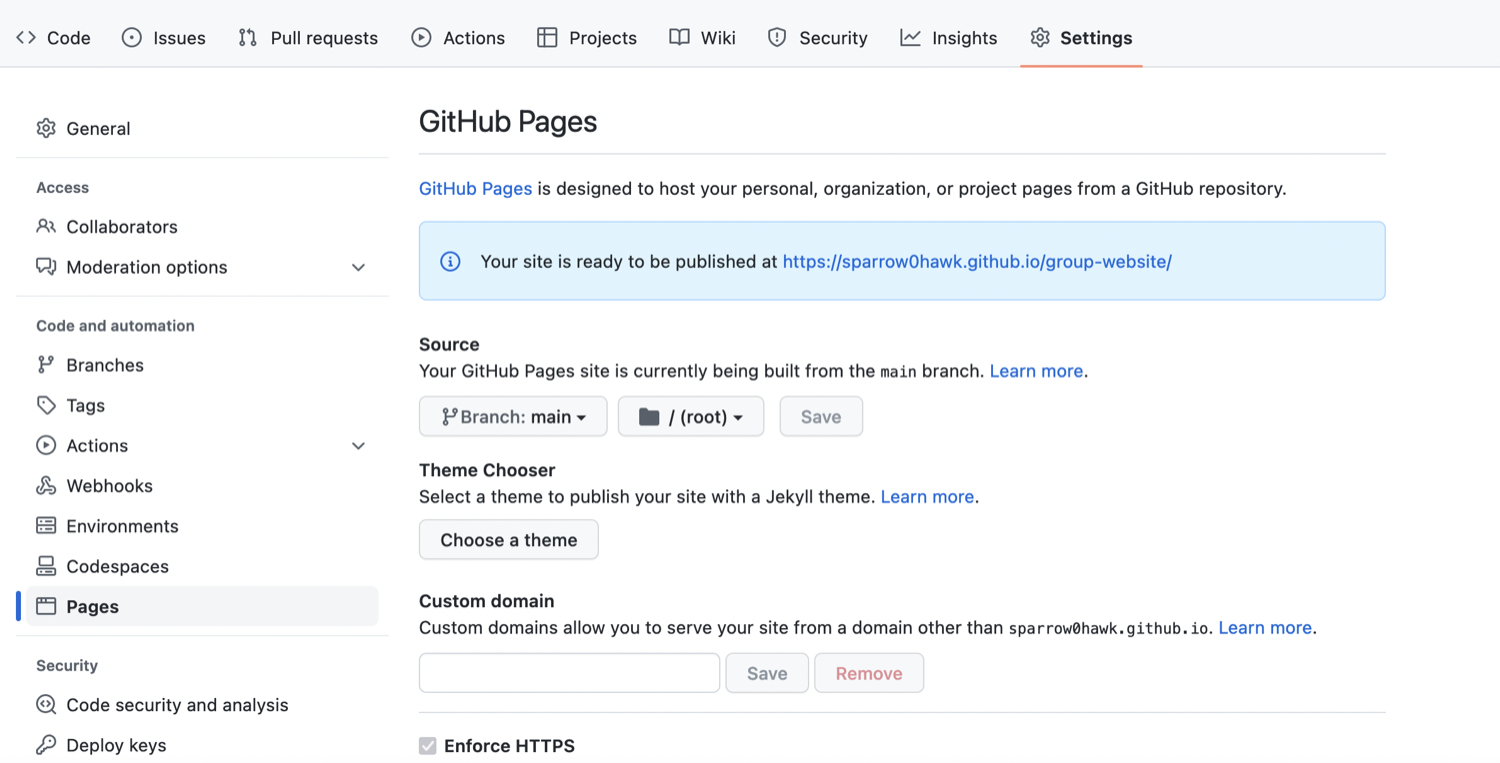 URL where the project website will be published by GitHub Pages
 -
It may take a while (from a few seconds to a few minutes) for GitHub to compile your website (depending on GitHub’s availability and the complexity of your website) and it may not become visible immediately. You will know it is ready when the link appears in green box with a “tick” in front of the web address (as shown in the figure below).
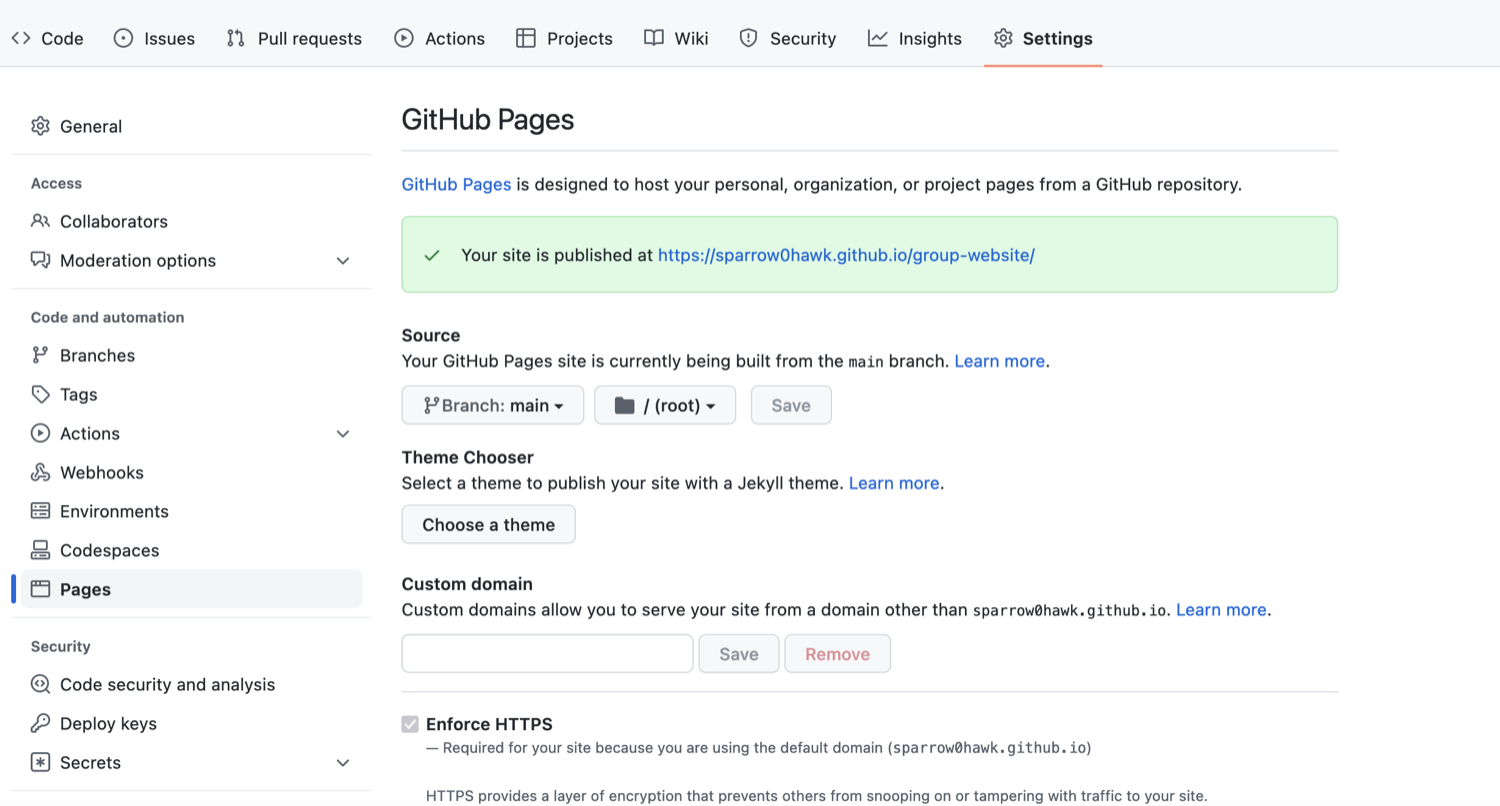 Project website URL - indication of a successful build
 -
Once ready, you should see the contents of the
README.mdfile that we created earlier, rendered as a website.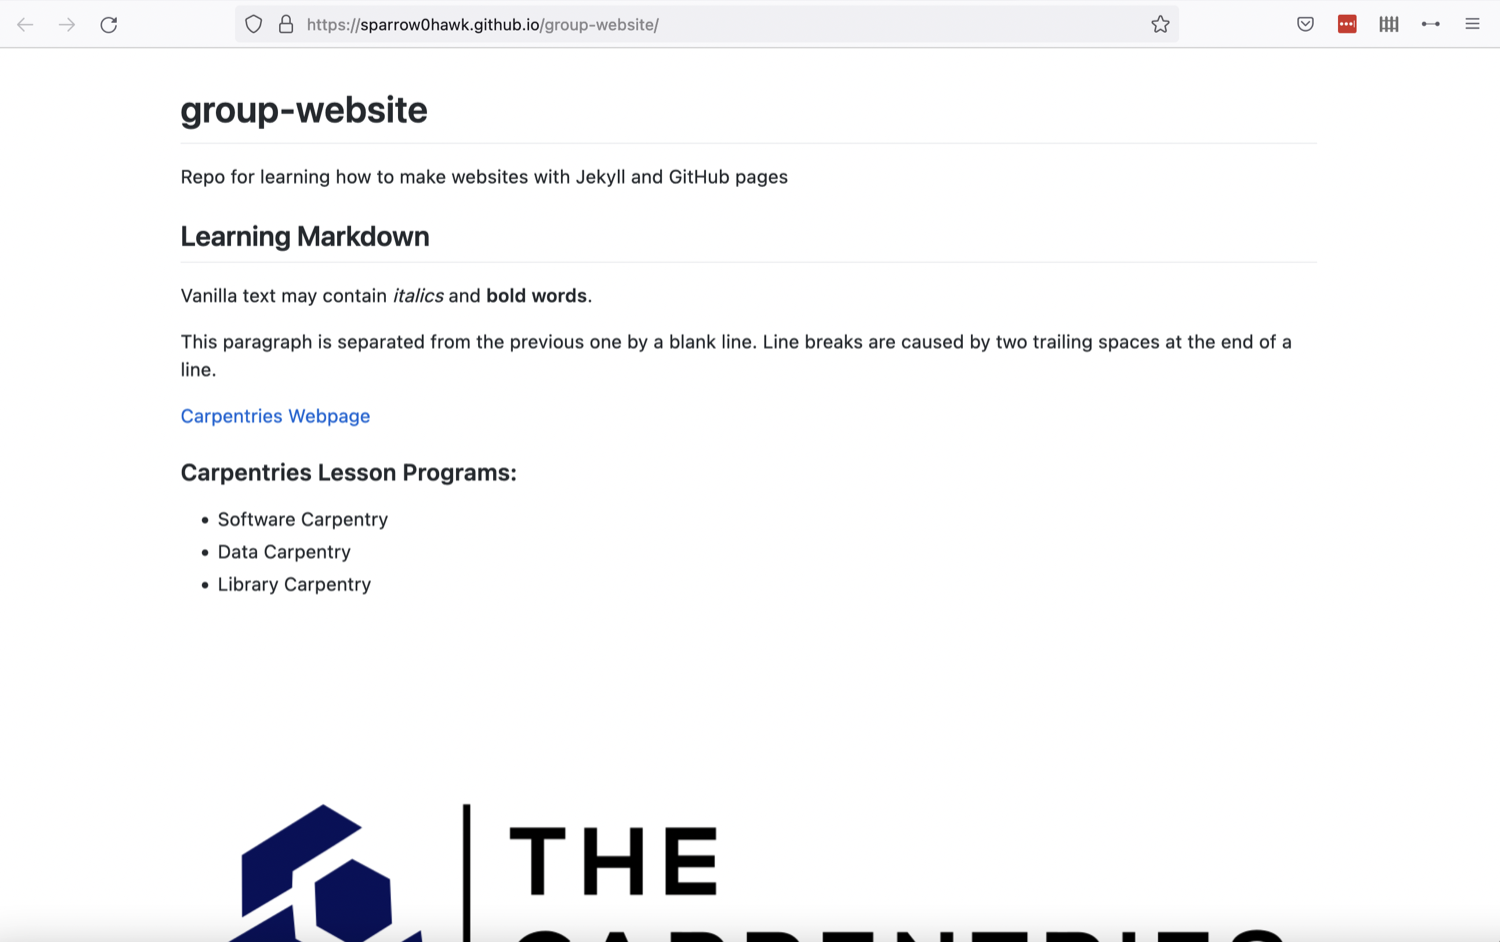 Our first website rendered by GitHub and showing the contents of README
Using Branch gh-pages for
Websites
By convention, GitHub Pages uses branch called gh-pages
to look for the website content. By creating a branch with that name,
you implicitly tell GitHub that you want your content published and you
do not need to configure GitHub Pages in Settings. Once you
create gh-pages from your current branch (typically
main, created by default when you created the repository),
you can then choose to delete the other branch to avoid any confusion
about where your content is stored.
Either of the above two approaches to turning a repository to a
website will give you the same result - the gh-pages
approach is perhaps more common as it favours convention over
configuration.
Understanding GitHub Pages’ URLs
You may have noticed a slightly strange URL for your website appearing in that green box with a “tick” in front of it. This URL was generated by GitHub Pages and is not random. It is formatted as ‘https://GITHUB_USERNAME.github.io/REPOSITORY_NAME’ and is formed by appending:
- your GitHub username or organisation name under which the repository is created (GITHUB_USERNAME)
- ‘.github.io/’ (GitHub’s web hosting domain)
- the repository name (REPOSITORY_NAME)
Because the repository name is unique within one’s personal or organisational GitHub account - this naming convention gives us a way of neatly creating Web addresses for any GitHub repository without any conflicts.
Customising Domain
GitHub Pages supports using custom domains, or changing your site’s URL from the default ‘https://GITHUB_USERNAME.github.io/REPOSITORY_NAME’ to any domain you own. Check out the documentation on configuring a custom domain for your GitHub Pages site.
Making Your Pages More Findable
On the right hand side of your repository on GitHub, you can see the
details of your repository under ‘About’. It is good practice to update
your repository details with a brief description. This is also a place
where you can put your repository’s Web URL (as not everyone will have
access to your repository’s Settings to find it) and add
descriptive topics or tags about the content or technologies used in
your repository or project.
You can edit the details of your repository by clicking on the little cog/gear button as shown on the figure below.
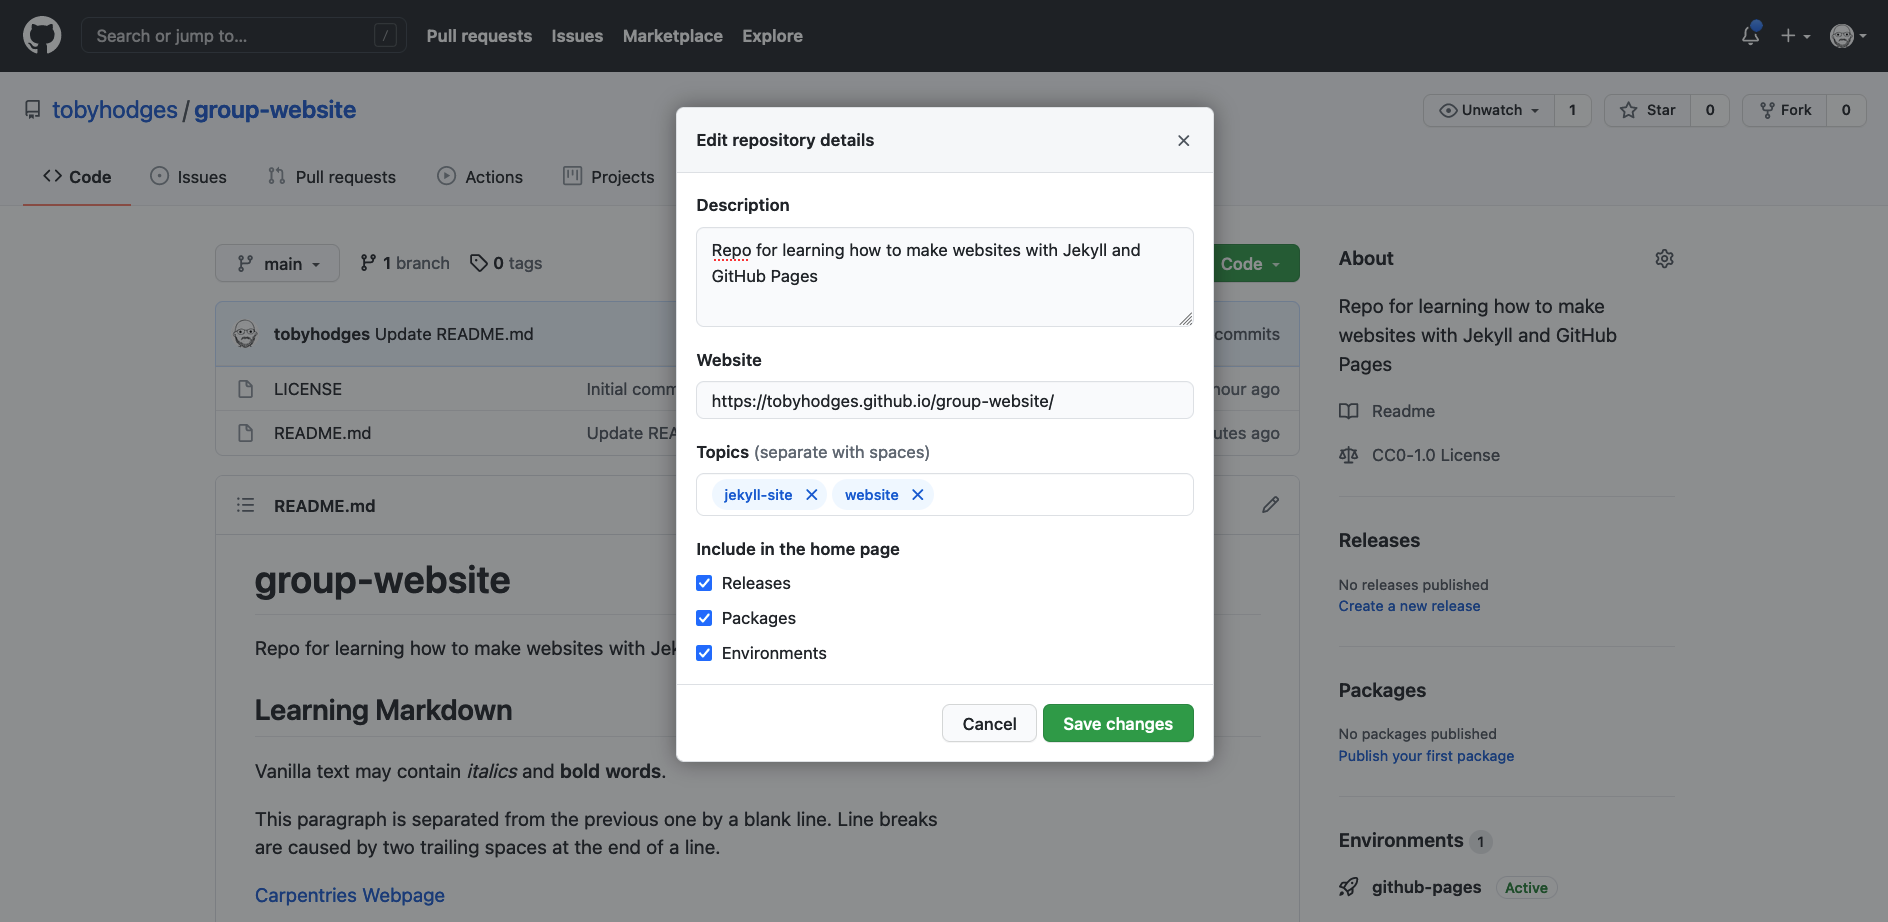
By doing this, you add a link to the repository’s website on your repository’s landing page and anyone (including yourself) can access it quickly when visiting your GitHub repository.
- “GitHub Pages is a static site hosting service that takes files in various formats (Markdown, HTML, CSS, JavaScript, etc.) straight from a repository on GitHub, builds them into a website, and publishes them on the Web”
- “By convention, if you create a branch called
gh-pagesin your repository, it will automatically be published as a website by GitHub” - “You can configure any branch of a repository to be used for website
(it does not have to be
gh-pages)” - “GitHub publishes websites on special URLs formatted as ‘https://GITHUB_USERNAME.github.io/REPOSITORY_NAME’”
Content from Starting With Haunt
Last updated on 2025-11-11 | Edit this page
Estimated time: 30 minutes
Overview
Questions
- “How can I create a static website with Haunt?”
- “How can I configure values/settings for my site?”
Objectives
- “Substitute variable values into page content”
- “Adjust the configuration of the site and individual pages”
Haunt is a
powerful static site generator. It creates static HTML website content
out of various files in your repository (Skribe files, Markdown files,
CSS style sheets, layouts, etc.). This ‘compiled’ content can then be
served as your website via the github.io Web domain
(remember your website’s URL from the previous episode?). Your GitHub
repository can be configured to re-generate all the HTML pages for your
website each time you make a change in it.
Haunt makes managing your website easier because it depends on templates. Templates are blueprints that can be reused by multiple pages. For example, instead of repeating the same navigation markup on every page you create (such a header, a footer or a top navigation bar), you can create a layout that gets used on all the pages. Otherwise, each time you update a navigation item - you’d have to make edits on every page. We will cover templates and layouts in a bit; for now let’s start learning Haunt and its scripting language called Scheme.
A first site
To create a Haunt site, fork the repository https://github.com/bkmgit/haunt-site and give it the name https://github.com/my-username.github.io Be sure to copy all branches of the repository.
Then go to settings, and choose to serve the site from the
gh-pages branch and from the root folder.
The website should be rebuilt whenever there are changes to the
repository. GitHub has a service called GitHub Actions. On the
settings page, expand the Actions submenu and choose the
General page. Ensure that - Allow all actions and
reusable workflows - Require approval for first-time
contributors = Read and write permissions are
selected. The save your settings. For more on GitHub Actions settings,
see the documentation.
Global Configuration
Haunt’s main configuration options are specified in a
haunt.scm file, which is written in called Scheme and placed in your site’s root
directory.
The initial global configuration contains
SCHEME
(use-modules (haunt asset)
             (haunt page)
             (haunt builder blog)
             (haunt builder atom)
             (haunt builder assets)
	     (haunt builder flat-pages)
             (haunt builder redirects)
             (haunt builder rss)
	     (haunt reader)
             (haunt reader skribe)
             (haunt reader texinfo)
             (haunt reader commonmark)
             (haunt site))

(site #:title "Built with Haunt, a Scheme Static Site generator"
      #:domain "bkmgit.github.io"
      #:build-directory "docs"
      #:default-metadata
      '((author . "A.N. Other")
        (email  . "ano@contact.me"))
      #:readers (list commonmark-reader texinfo-reader skribe-reader sxml-reader html-reader)
      #:builders (list (blog)
                       (atom-feed)
                       (atom-feeds-by-tag)
                       (rss-feed)
                       (static-directory "images")))
Let’s modify the parameters for our website.
- From the GitHub interface, click on the
haunt.scmfile in your site’s root directory. - Click on the pencil icon to edit the
haunt.scmfile. - Update the author to
your nameand domain tomyusername.github.io - Optionally update the email or remove it if you do not wish to share your email address.
- Commit your changes.
A first change
Go to the code section of the repository, then view the
posts folder and click on my-first-post.skr
which should contain
SCHEME
(post
 :title "My first post!"
 :date (make-date* 2025 06 21 09 00)
 :tags '("Skribe" "scheme" "program")

(h1 [My first post!])

(p [This is a static website and blog.])

(p [The source is written in Skribe, a
    document format that allows you to use
    embed scheme programs to create your
    document.])

(p [1 + 2 + 3 + 4 + 5 = ]
   (+ 1 2 3 4 5)))
The post contains some metadata including the title and date as well
as tags to be used to indicate the topics of interest. It is written in
Skribe. Text is enclosed in square brackets [] and code and
annotations are enclosed in parenthesis (). The tag
h1 indicates a first level heading and the tag
p indicates a paragraph.
The third paragraph is unusual, there is a string
[1 + 2 + 3 + 4 + 5 =] in square brackets followed by an
expression (+ 1 2 3 4 5) in parenthesis. The expression is
evaluated when generating the website.
Go to your website which should be avilable at https://my-username.github.io there should be a page
with a link to your first blog post. Click on the link to open the first
blog post. The last line should have
1 + 2 + 3 + 4 + 5 = 14.
When Things Go Wrong
So far we have seen how to successfully use Haunt to produce a website. There are however some situations where Haunt may fail to do so either due to a typo or missing information.
Challenge: Troubleshooting Haunt
This exercise will help you recognise what common mistakes look like when working with these elements of a Haunt website.
Edit your haunt.scm file and omit a closing parenthesis
) in one of the lists.
For instance, a missing closing parenthesis ) after blog
in the site section.
SCHEME
(use-modules (haunt asset)
(haunt page)
(haunt builder blog)
(haunt builder atom)
(haunt builder assets)
(haunt builder flat-pages)
(haunt builder redirects)
(haunt builder rss)
(haunt reader)
(haunt reader skribe)
(haunt reader texinfo)
(haunt reader commonmark)
(haunt site))
(site #:title "Built with Haunt, a Scheme Static Site generator"
#:domain "bkmgit.github.io"
#:build-directory "docs"
#:default-metadata
'((author . "A.N. Other")
(email . "ano@contact.me"))
#:readers (list commonmark-reader texinfo-reader skribe-reader sxml-reader html-reader)
#:builders (list (blog
(atom-feed)
(atom-feeds-by-tag)
(rss-feed)
(static-directory "images")))Haunt will refuse to build the website and produce an error message.
We will see after this where to find the error message and identify what caused them.
If you were keeping an eye on the GitHub repository page until now, you may have noticed a yellow circle visible when the website is still being processed and a green check mark (✓) when successful. You may have also noticed that in the same location there is now a red cross/X next to the commit message (❌). This indicates that something went wrong with the Haunt build process after that commit.

You may also find an email from GitHub in your inbox with details about the error. But let’s look at our repository again. If we click the red cross/X next to the commit message (❌) a little pop-up will appear with additional information.
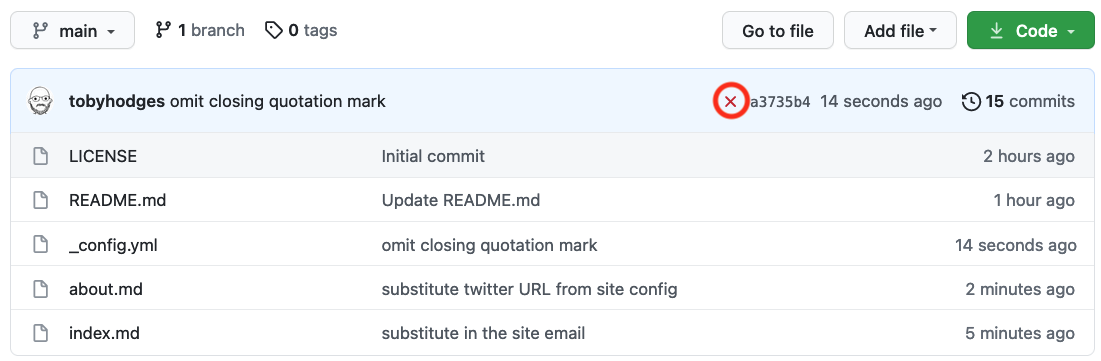
Visiting the page behind the Details link will give us the information we were missing.
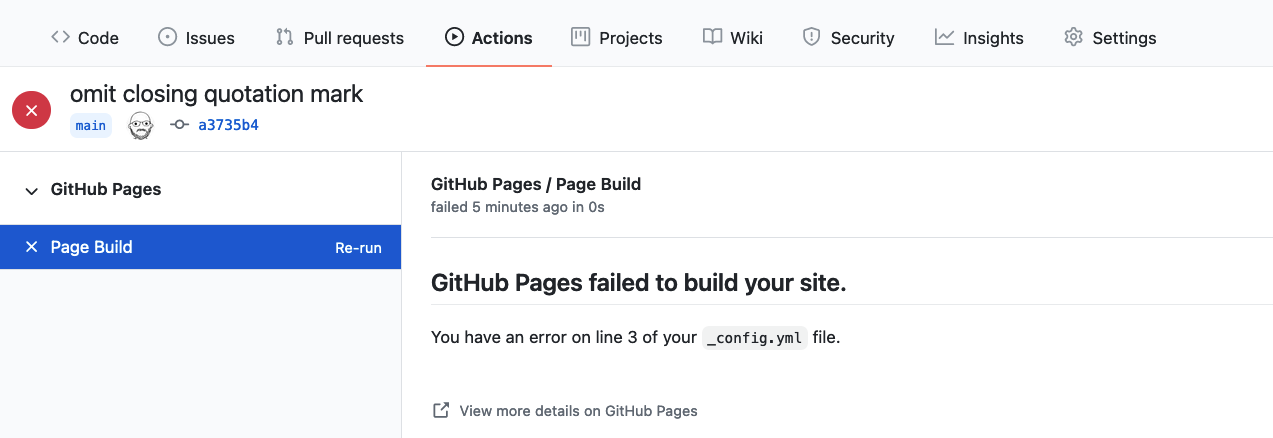
The build should contain output with some content similar to
OUTPUT
ice-9/read.scm:126:4: In procedure lp:
haunt.scm:27:1: unexpected end of input while searching for: )From this page we can see that what caused the failure affected the
haunt.scm file, and we should check for a missing
parenthesis. Since this typo prevents Haunt from building the page, the
process cannot continue.
Failure Will Not Remove Your Website
Given the failure you may be wondering what happened to the website? If you visit the address you will find that the website is still be available.
GitHub will keep your previous version online until the error is fixed and a new build is completed successfully.
Lets go ahead and fix your intentional typo and re-add the missing
):
SCHEME
(use-modules (haunt asset)
(haunt page)
(haunt builder blog)
(haunt builder atom)
(haunt builder assets)
(haunt builder flat-pages)
(haunt builder redirects)
(haunt builder rss)
(haunt reader)
(haunt reader skribe)
(haunt reader texinfo)
(haunt reader commonmark)
(haunt site))
(site #:title "Built with Haunt, a Scheme Static Site generator"
#:domain "bkmgit.github.io"
#:build-directory "docs"
#:default-metadata
'((author . "A.N. Other")
(email . "ano@contact.me"))
#:readers (list commonmark-reader texinfo-reader skribe-reader sxml-reader html-reader)
#:builders (list (blog)
(atom-feed)
(atom-feeds-by-tag)
(rss-feed)
(static-directory "images")))After a few seconds we should see a green checkmark again and our website will be updated.
Challenge: Practice With Troubleshooting
Sometimes typos happen and can make your website change in surprising ways. Let’s experiment with some possible issues that might come up and see what happens.
Try the changes listed below on your my-first-post.skr
file and see what happens when you try to build the site. You will want
to correct the previous mistake each time.
- Remove an opening square bracket
[. - Remove a closing square bracket
]. - Change
:tags '(to:tags (. - Change
:datetodate. - Change
(p [The sourceto( [The source.
- The site refuses to build and the build logs have an error message.
OUTPUT
ERROR: In procedure %resolve-variable:
Unbound variable: #{\x5d;}#- The site builds, butwhen viewed in a browser a section is extended. Example generated html is below.
HTML
<!DOCTYPE html><head><meta charset="utf-8" /><title>My first post! — Built with Haunt, a Scheme Static Site generator</title></head><body><h1>Built with Haunt, a Scheme Static Site generator</h1><h2>My first post!</h2><h3>by A.N. Other — Sat 21 June 2025</h3><div><h1>My first post!)
(p [This is a static website and blog.</h1><p>The source is written in Skribe, a
document format that allows you to use
embed scheme programs to create your
document.</p><p>1 + 2 + 3 = 6</p></div></body>- The site refuses to build with the output message
OUTPUT
ice-9/eval.scm:217:33: In procedure lp:
Wrong type to apply: "Skribe"- When the colon before
dateis removed the site refuses to build with the error message:
OUTPUT
ERROR: In procedure %resolve-variable:
Unbound variable: date- When the
pannotation is removed the site refuses to build with the error message:
OUTPUT
ice-9/eval.scm:217:33: In procedure lp:
Wrong type to apply: ("The source is written in Skribe, a\n document format that allows you to use\n embed scheme programs to create your\n document.")Challenge: Practice With Troubleshooting (continued)
Note: Be sure to fix any errors you intentionally introduced in your page before moving on.
- “Sites can be built by GitHub using GitHub Actions”
- “Site build configuration is done in
haunt.scm” - “Errors can happen but Haunt will often tell us something is wrong”
Content from Authoring With Skribe
Last updated on 2025-11-11 | Edit this page
Estimated time: 35 minutes
Overview
Questions
- “How can I write content for my webpages?”
- “How do I link to other pages?”
Objectives
- “Create simple pages with formatted text”
Skribe
Skribe is a language used to enable writing documents that can be output in a variety of formats include HTML. Plain text characters and parenthesis are used in place of HTML tags. These characters are then processed by Haunt (or another script or application) and transformed into HTML. Skribe separates content from layout and formatting details which are handled by a program. Frequently used elements, like headings, paragraphs, lists and text formatting (i.e. bold, italic) are part of Skribe. Skribe’s simplified syntax keeps content human-readable. Skribe’s power comes from the ability to use Scheme to automate and customize the websites you create relieving you of tedious repetitive work.
Challenge
Challenge: Learn more about Skribe
Read through the paper introducing Skribe. Note that some of the annotations used differ from the Skribe implementation in Haunt.
- What features make Skribe attractive?
- What are some output formats that have been programmed to be generated from Skribe?
- What is type checking and why might it be helpful? What drawbacks does type checking have?
- Skribe uses scheme to allow one to create a compact notation that describes writer intent for formatting. Skribe allows one to use code to create documents that can be output in multiple formats.
- Skribe documents can be output to HTML, TexInfo and through LaTeX to PDF.
- A type system is a way of associating a set of properties to variables in a program. It is similar to how units are assigned to physical quantities, for example one might measure length in meters and speed in meters per second. Types allow programs to prevent some errors - for example it can be reasonable to add two distances, but it is not reasonable to add a distance to a speed. It is however reasonable to calculate a speed knowing distance travelled in a certain time. Type checking can increase the time it takes for a program to be compiled and/or run as extra operations are needed to verify the rules associated to each type are satisfied.
Where to Start Writing Skribe?
When editing Skribe source code, many editors will help you by highlighting matching brackets and parenthesis. You can also customize text editors you install on your own hardware to provide additional features, such as highlighting.
As we are working towards authoring websites using Haunt and GitHub
pages, we will use GitHub straight away for learning the basics of
Skribe. The GitHub project you created in contains a file
my-first-post.skr.
TODO: Add image
Click on that pencil symbol to open an editing interface of your
project’s my-first-post.skr file. Once we’ve clicked the
pencil symbol, GitHub will open that file in the editing interface.
TODO: Add image
Let us change the content by modifying written in Skribe
to written in (bold Skribe). Examine the rendered view by
clicking the Preview changes tab.
TODO: Add image
GitHub shows green vertical bars visually highlighting the new
content. To save the content to the file my-first-post.skr,
search for a Commit changes button. After having changed
something, the commit menu looks like this:
TODO: Add image
Writing a Commit Message
A commit message is a short, descriptive, and specific comment that will help us remember later on what we did and why. When editing in the Github interface, it will suggest a vague message about which file you’ve updated or added. It is best practice to change this message to a short but more informative message about what in the file has changed. This more descriptive message will make it much easier if future you needs to go looking through the history for which commit made a specific change. You can find more about writing commit message in the Software Carpentry Version Control with Git lesson.
Commit this change to the main branch, wait for the
website to rebuild then view the website.
TODO: add image of update post
Writing Skribe
Now that we know about the editing interface and preview tab of our
projects my-first-post.skr we can use it as a text editor
and investigate selected Skribe features.
Our my-first-post.skr already contains vanilla text and
three formatting features:
- Heading
(h1 [My first post!]) - Paragraph
(p [This is a static website and blog.]) - Emphasis using
(bold Skribe).
Additionally it shows how to evaluate a scheme expression:
- `(+ 1 2 3 4 5)
Let’s learn some more Skribe by adding some formatting and see what
happens when we rebuild the website. Add the following to your
my-first-post.skr file.
SCHEME
(post
:title "My first post!"
:date (make-date* 2025 06 21 09 00)
:tags '("Skribe" "scheme" "program")
(h1 [My first post!])
(p [This is a ,(em static) website and blog.])
(p [It forms the basis of a ,(anchor "Carpentries" "https://carpentries.org/") lesson.])
(p [Some established Carpentries lesson programs are:
,(ol
(li Software Carpentry)
(li Data Carpentry)
(li Library Carpentry))])
(p [The source is written in (bold Skribe), a
document format that allows you to use
embed scheme programs to create your
document.])
(p [1 + 2 + 3 + 4 + 5 = ]
(+ 1 2 3 4 5)))If you click the preview button, GitHub will show a
preview of differences, the green bar indicates added lines, and the red
bar indicates deleted lines.
TODO: Add image
You can then commit changes, wait for the site to build and then check how your new changes appear online.
TODO: Add image
Line breaks
All text has so far been grouped into either a header, a list or a paragraph. The output has linebreaks automatically inserted. This allows for a variety of output formats where the layout is determined according to the context and linebreaks are automatically inserted appropriately.
Let’s do an exercise to try out writing more Skribe.
Challenge: Try Out Skribe
Read through the Haunt Skribe
implementation to add the following to your
my-first-post.skr:
- A second level heading
- Some text under that second level heading that includes a link and bold text.
- A third level heading
- A numbered list
- Bonus: Add this image https://github.com/carpentries/carpentries.org/blob/main/static/thecarpentries-opengraph.png
For example your might add the following:
SCHEME
(h2 [More about Skribe])

(p [You can find this lesson
    ,(anchor "here" "https://bkmgit.github.io/haunt-intro").]

(h3 [Four reasons you should learn Skribe:])

(ol
 (li [Less formatting than HTML])
 (li [Easy to read even with formatting])
 (li [Powerful programming environment])
 (li [Allows you to ,(em [automate]) the
      ,(bold [boring]) stuff.]))

(image "/images/thecarpentries-opengraph.png"))
Where the image file is obtained from https://github.com/carpentries/carpentries.org/blob/main/static/thecarpentries-opengraph.png and placed in the images folder
TODO: Add image of generated site
Reference-Style Links
Up to now, we have used inline-style links which have the URL inline with the description text, for example:
If you use a link more than once, consider using so called
reference-style links instead. Reference-style links reference
the URL via a label. In Haunt, we can write a module to accomplish this.
Create a file links.scm and within it add
SCHEME
(define-module (links)
  #:use-module (haunt skribe utils)
  #:export (%carpentries))

(define (%carpentries)
  (anchor "The Carpentries" "https://carpentries.org"))
Then modify posts/my-first-post.skr to contain
SCHEME
(add-to-load-path "../")
(use-modules (links))

(post
 :title "My first post!"
 :date (make-date* 2025 06 21 09 00)
 :tags '("Skribe" "scheme" "program")

(h1 [My first post!])

(p [This is a static website and blog.])

(p [The source is written in Skribe, a
    document format that allows you to use
    embed scheme programs to create your
    document.])

(p [1 + 2 + 3 + 4 + 5 = ]
   (+ 1 2 3 4 5))

(h2 [More about Skribe])

(p [You can find this lesson
    ,(anchor "here" "https://bkmgit.github.io/haunt-intro").])

(h3 [Four reasons you should learn Skribe:])

(ol
 (li [Less formatting than HTML])
 (li [Easy to read even with formatting])
 (li [Powerful programming environment])
 (li [Allows you to ,(em [automate]) the
      ,(strong [boring]) stuff.]))

(p [To find out more about the Carpentries,
    go to the ,(%carpentries)  website.])

(image "/images/thecarpentries-opengraph.png"))
This follows the DRY principle, avoiding redundant specification of information.
Note about image use and attribution
When using images on your website that you don’t own, it’s important to reuse the content responsibly. This means ensuring that the image owner has given permission for the image to be reused and that the image includes appropriate attribution to the owner. If you’re unsure about the availability of an image you can always contact the owner or check if a license is provided alongside the image which may include conditions for reuse. Anyone can re-use and edit Public Domain images so searching for images in the public domain can be a good way to find images for your website. However, it is still good practice to give credit when possible, even for public domain images.
We will continue to use Skribe and learn more throughout the rest of the lesson.
A note on documents created by Skribe
The basic building blocks used to create a Skribe document are the same, but because of its extensibility, you will need to read through the code to determine what new functionality has been added to material created using Skribe. Do not expect to be able to copy and paste material from one Skribe document to another without understanding it and modifying it for your needs.
Optional Exercise: Examine other Haunt sites
- The Bootstrapable builds site is created using Haunt and uses Skribe for its posts. Examine the source.
- The ActivityPub site is created using Haunt and uses Skribe for its posts. Examine the source.
- Karl Hallsby’s blog is created using Haunt and uses SXML for its posts. Examine the source. A brief description of SXML is also available on wikipedia.
How do SXML and Skribe differ?
SXML is a markup language that faciliates using Scheme to work with XML documents. Skribe is a document as a program. Both Skribe and SXML can be converted to XML, to take advantage of the powerful query, validation and transformation tools available for XML.
More Skribe Features
Check out our Extras page on Skribe for a more comprehensive overview of Skribe, including how to create fenced code blocks, do syntax highlighting for various languages and typeset academic papers. Do also examine the discussion on Skribe as used in Skribilo, which more closely follows the original Skribe specification documented in the Skribe manual.
- “Skribe is a powerful and relatively easy way to write formatted text”
- “Skribe allows a single source to be output to a variety of formats, including html and pdf”
Content from Reusing Blocks of Content
Last updated on 2025-11-11 | Edit this page
Estimated time: 75 minutes
Overview
Questions
- “How can I reuse the same chunks of material in multiple pages?”
Objectives
- “Create reusable blocks of content and insert them into pages”
In the previous episode, we discussed the benefits of creating a file with commonly use links to enable us to reuse these throughout our pages. However, repeated use of content in and across websites is usually not limited to individual values such as website links.
Challenge: What Gets Reused?
Look at the three pages linked below, and browse some other pages on the same site.
- Bootstrappable Builds
- [Karl Halsby][karl-halsby]
- g0v.tw
- What content is being reused between pages on these sites?
- Pair up and compare your partner’s notes with your own.
- Can you identify any common type(s) of content that is being reused in these sites?
The Bootstrappable Builds website reuses many structural elements, such as the page header (containing the menu and the logo) and footer (containing licensing information, links to contact the maintainers and the source code).
Karl Halsby’s site has the same kind of shared header and footer on each page: this is a common theme across most websites, helping to improve navigation and other aspects of the user experience and achieve consistent “branding” across the whole site.
g0v.tw has shared headers and footers, although the main landing page does not have the sharedheader. The site is available in three languages and images are reused between the translated pages. Not all pages are translated though.
The most commonly reused content is structural: menus and branding information used to present a consistent and recognisable interface to the user regardless of which specific page of the site they’re visiting. We’ll look more at that in the next episode. But some content, such as contact statements and post/product listings, can be reused in the body of pages. The motivation for reusing content like this is that, if you need to update that content - changing the contact address, updating a price or picture associated with a listing, and so on - you need only change this information in one place for the update to be propagated across the whole site. This is related to the DRY (Don’t Repeat Yourself) principle of good practice in programming.
DRY (Don’t Repeat Yourself) Principle
DRY principle is one of the basic principles of software development aimed at reducing repetition of information.
Two of the three sites linked in the previous exercise are built with Haunt. But the principles behind reusing content apply regardless of the particular framework being used to build the site.
Reusing Site Footer
Let’s look at an example of how we can create a block of common
content and reuse it in multiple pages on our site. Websites typically
have some text and links at the bottom of each page to help visitors
with links to privacy information, site source code and site licensing
information. To make these links appear above every page on our site, we
could add the same code at the end of each skribe file in our
repository. But if we wanted to modify this information, we would need
to make the same adjustment on every page. This is both time-consuming
and error-prone: it would be easy to accidentally mistype a link or
forget to update one of the files. Instead, we can go some way to avoid
this hassle by using some magic that Haunt provides:
programmability.
To demonstrate this, we will modify the haunt.scm file
to add a footer to each page.
SCHEME
(use-modules (haunt asset)
             (haunt builder blog)
             (haunt builder atom)
             (haunt builder assets)
	    (haunt builder flat-pages)
             (haunt builder redirects)
             (haunt builder rss)
	    (haunt html)
	    (haunt page)
	    (haunt post)
	    (haunt reader)
             (haunt reader skribe)
             (haunt reader texinfo)
             (haunt reader commonmark)
             (haunt site)
	    (srfi srfi-19))

(define footer
  `(footer
    (p "Made with "
       (a (@ (href "https://dthompson.us/projects/haunt.html"))
	 "Haunt")
       ".")
    (p "Subscribe to "
       (a (@ (href "/feed.xml")) "atom")
       " or "
       (a (@ (href "/rss-feed.xml")) "rss")
       " feeds.")))

(define demo-theme
  (theme #:name "demo-theme"
	#:layout
	(lambda (site title body)
	  `((doctype "html")
		     (head
		      (meta (@ (http-equiv "Content-Type") (content "text/html; charset=UTF-8")))
		      (meta (@ (http-equiv "Content-Language") (content "en")))
		      (meta (@ (name "viewport") (content "width=device-width")))
		      (title ,(string-append title " - " (site-title site)))
		      (link (@ (rel "alternate")
				(type "application/atom+xml")
				(title "Atom feed")
				(href "/feed.xml"))))
		     (body (@ (id "page"))
			   (div (@ (id "content"))
				,body))
		     ,footer))
	#:post-template
	(lambda (post)
	  `((article
	     (h1 (@ (id "title")) ,(post-ref post 'title))
	     (div (@ (id "date")) ,(date->string (post-date post) "~B ~d, ~Y"))
	     (div (@ (id "post")) ,(post-sxml post)))))
	#:collection-template
	(lambda (site title posts prefix)
	  (define (post-uri post)
	    (string-append prefix "/" (site-post-slug site post) ".html"))
	  `((h1 ,title)
	    (p (ul (@ (id "posts"))
		   ,@(map (lambda (post)
			    `(li
			      (a (@ (href ,(post-uri post)))
				 ,(post-ref post 'title))))
			  posts)))))))

(site #:title "Built with Haunt, a Scheme Static Site generator"
      #:domain "bkmgit.github.io"
      #:build-directory "docs"
      #:default-metadata
      '((author . "A.N. Other")
        (email  . "ano@contact.me"))
      #:readers (list commonmark-reader texinfo-reader skribe-reader sxml-reader html-reader)
      #:builders (list (blog #:theme demo-theme)
                       (atom-feed)
                       (atom-feeds-by-tag)
                       (rss-feed)
                       (static-directory "images")))
Commit your changes and once the site has built preview it. Notice that the landing page is fine, but the linked blog post has the title twice. To fix this, modify the blog post file so that the title is not in the top of the blog post, but is instead inserted by the template from the metadata.
SCHEME
(add-to-load-path "../")
(use-modules (links))

(post
 :title "My first post!"
 :date (make-date* 2025 06 21 09 00)
 :tags '("Skribe" "scheme" "program")

(p [This is a static website and blog.])

(p [The source is written in Skribe, a
    document format that allows you to use
    embed scheme programs to create your
    document.])

(p [1 + 2 + 3 = ]
   (+ 1 2 3))

(h2 [More about Skribe])

(p [You can find this lesson ,(anchor "here" "https://bkmgit.github.io/haunt-intro").])

(h3 [Four reasons you should learn Skribe:])

(ol
 (li [Less formatting than HTML])
 (li [Easy to read even with formatting])
 (li [Powerful programming environment])
 (li [Allows you to ,(em [automate]) the ,(strong [boring]) stuff.]))

(p [To find out more about the Carpentries, go to the ,(%carpentries)  website.])

(image "/images/thecarpentries-opengraph.png"))
Commit your changes, wait for the site to build and then refresh the page where the blog post is rendered. There shoul now only be one title.
TODO: Add image
Challenge: Add content licensing information
The repository has a license for the code used to generate it, but not for the content. Creative commons has a list of licenses for sharing content. They have a guide to enable you to choose an appropriate license to share your work. Follow the guide to choose a license and add it to your footer.
You might also consider using a creative commons license specific to your country or available in the language of your blog. A list of Creative Commons affiliates is available on the Creative Commons wiki, check if a more suitable license is available for your content.
Modify the footer section in haunt.scm so that it is
now:
SCHEME
(define footer
  `(footer
    (p "Made with "
       (a (@ (href "https://dthompson.us/projects/haunt.html"))
          "Haunt")
       ".")
    (p "Content available under "
       (a (@ (href "https://creativecommons.org/licenses/by-sa/4.0/"))
          "Creative Commons Attribution-ShareAlike 4.0 International")
       " License.")
    (p "Subscribe to "
       (a (@ (href "/feed.xml")) "atom")
       " or "
       (a (@ (href "/rss-feed.xml")) "rss")
       " feeds.")))
TODO: Add image
This is another example of how we can create a block of common content and reuse it in multiple pages on our site.
- “Programming is like a bicycle for the mind, it can increase our efficiency”
- “Choose licensing information for your content appropriately”
Content from References
Last updated on 2025-11-11 | Edit this page
Estimated time: 0 minutes